Bhsgarden@blogspot.com

Saturday, April 25, 2020

Composting makes gold for your garden


Compost the gold for our gardens because it is the ultimate recycling we can do at home.  BUT It can go bad easily if we don’t
 feed it correctly.  Smell, rodents?

I’ve included two methods in the post.  The first is our method used at the BHSD17C school gardens.  The second article details the easiest way to compost I’ve found.  I do this all winter in my garden beds and by spring, magically fertile soil.  The following images created by fix.com are detailed.  For me, I don’t get all involved in the rotation.  I dig a trench and go from there.  Enjoy.

Let’s start with the system we use at the Brookings Harbor School District 17C.

Our local waste company has changed their trash bins and we were gifted 6 of their old rolling bins.  We drilled holes in the bottom for drainage and we started to layer our compost.  Here’s what we used:

Shredded paper,
Leaves
Cafeteria waste
Fall garden vegetation
Water
A bucket full of last year’s compost to get things started
Composting worms from our in classroom lessons

This system has worked really well!  See, you can compost almost anywhere.  Get creative.


Compost bin dumped and adding shredded paper

Finished bins put away for winter

Student workers turning compost before returning to the rolling bins.

***************


What if I told you that you can have all the benefits of compost without the bin? Trench compositing doesn’t require a lot of space and it allows gardeners to fertilize their soil without having what some consider an eyesore in their yard. 

The process of creating your trench is incredibly easy. Simply dig a trench 12 inches deep in your garden and fill it half way with kitchen scraps. Fruits and vegetables are great for adding nutrients and moisture to your soil. We suggest avoiding putting bread products, oils, meat, dairy, saw dust, human waste, and rice in your compost. Also, be careful not to compost weeds in your trench, they could sprout up in your garden! Once you have your food scraps in your trench, fill the rest of the hole with soil and let nature do its thing. 

Each year move your compost trench to a different part of the garden. Begin by dividing your garden into three spaces: Zone A, B, and C. Zone A will house your compost trench while B and C will be your walking space and plants. After year 1, move your compost trench to Zone C and your plants to Zone B. By year 3 you should be digging your compost trench in Zone B and planting in Zone A. This ensures your compost is evenly dispersed below your garden. After year three, begin the process again. 

You can also place compost trenches between evenly-spaced plant crops, along shrub boarders, and around flowers and vegetable plants. 

Friday, April 24, 2020

How to get started with a kitchen garden

It can be overwhelming to get started building your kitchen garden.  Let’s break down a few of the questions I regularly get. 

Where can I put a garden?  As long as your garden plot gets 8 hours sun and is NOT directly facing the ocean or under a redwood or cedar tree you’re good.

What type of garden should I grow?  Herb garden?  Kitchen garden (supplies produce for you to cook with), Permaculture? Raised Beds?  Hills?  Terraces?  Flowers/pollinators? Look at what you need that will help you decide.
2017 Agri Hood Crew

Do you have access to water?  Easy access to water is a must.  Even if you run a hose to you garden be sure to have enough water pressure to run your irrigation system.

Where do I get dirt? Bagged soil costs so much.  Yes bagged soil can cost a lot.  You can utilize your native soil and add commercial soil. (Grocery Outlet has really good additive soil at $9 for 2 CF.   You can make your own soil with Perlite, compost and home soil.  Harbor Hydro sells coarse perlite.

I am unable to build garden beds who will build the garden beds?  You can hire a neighbor student.  Or encourage family to get involved.  Take it slowly enjoy the process.

What if I do it wrong?  My only comment on this question is nature happens.  Things grow, especially here on the CA/Oregon Coast.  Read the backs of your seed packets they will give you all the information you need.  

Here’s my list of 7 tasks.  To get started on this week

1.  Lay out area for vegetable garden -  take some time to draw it out and plan the year. IF you don't have an area, plan on growing in pots, be creative.


2.  If you have existing beds, weed them making sure to get those roots too.

3.  Amend soil with composted manure, commercial potting soil or your own compost.  Core, Perlite, leaves - look around your property.  Next week is garden waste pick up.  Check out your neighbors pile you may want to raid it for compost started. 

4.  Start seeds in a sunny window or greenhouse, always keep lettuce starts growing, tomatoes start inside, cucumbers, zucchini, pumpkin, winter squash, green beans, peppers and herbs.  Here is my K Cup seed starting system that hangs in my East facing window. 

5.  Kill slugs any way you can.  The babies are hatching and will graze through everything you plant. Many use a bucket of bleach water and hand pick early in the morning or in the evening.  Beer really doesn’t work because all you’ll have is a slug frat party in you garden!

6.  Think about a water catchment system to 'harvest' the rainwater off your roof to water your garden beds.

7.  In our climate we can sow broccoli, peas, carrots, potatoes, garlic, onions, cabbage, lettuce, kale, chard, leeks and raddishes NOW.

Wednesday, April 22, 2020

Composting - An Earth Week Activity

Happy Earth Week!

In 2017 I worked with Ms Legat’s 4th graders to compost all the trash from their cafeteria on April 22, 2017.  


The purpose was not only to help the students visualize what is and isn’t compostable but to bring awareness to how much food is wasted and the quantity of trash students make during their lunches.


Students learned about composting, types of composting (Hot, Cold, Worm) and the effects of trash and plastics on our rivers and ocean.  They made posters that were used during the event and they took data.


They weighed each bag collected from each of the 5 class lunch periods and found the Kindergarteners made the most trash!


  Finally they created a bulletin board to display their findings.

In 2019 I worked with the Leadership class at Azalea Middle school to hold the same event.  This time the outcome had a different twist.   Though the Elementary school trash was mostly wasted food, the Middle School trash was 75% plastic!  That was a surprise to me.

So what will YOU do to celebrate Earth Week this year?  Post your ideas in the comments below.  


Monday, April 20, 2020

When Gardens Grow...and Grow...and Grow

Gardens are tricky.  Some weeks, we see every last cherry tomato, lettuce leaf, and green bean as a miracle--- almost too precious to eat.  As the season progresses, and our gardens produce more food than we can possibly eat, we ask ourselves, "what was I thinking when I planted all of this?"

This story examines how gardens can start small and bring communities together.  

This week we will celebrate Earth Day, perhaps you can celebrate at home by planting a garden with your family.  

I hope this story inspires you. 


Sunday, April 19, 2020

Earth day is this week, April 22

Welcome to Earth Week


Earth day which was created 50 years ago is on April 22nd.  I had BIG plans for all three campuses in the Brookings Harbor School District to do Earth Day projects.  With our Covid19 isolation it’s up to you, my students, to celebrate Earth Day.


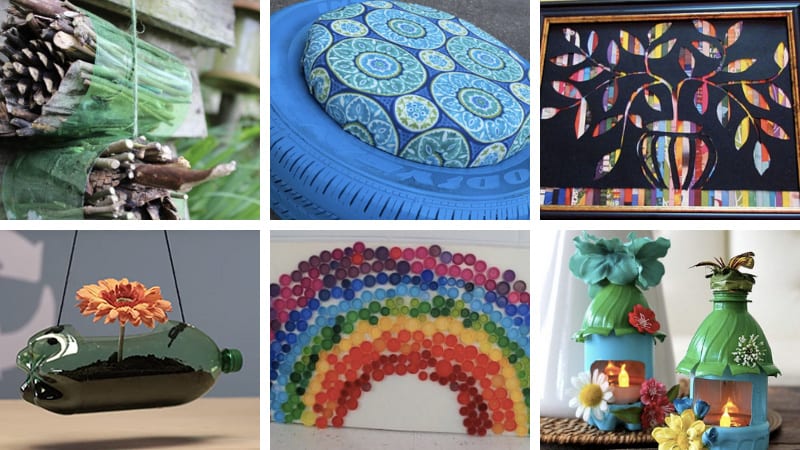
Earth Day is coming! How do you plan to celebrate? Buying brand-new craft supplies to celebrate and learn about Earth Day would seem squarely out of sync with the recycle-reuse-renew lessons we are teaching our kids, right? Don’t worry. We’ve got you covered. Let’s raid your recycling bins for supplies and then try one of these eco-savvy Earth Day crafts that is sure to excite kids of all ages.

1. Make wildflower seed bombs.

Give back to Mother Earth with these easy-to-make seed bombs. Blend together used scraps of construction paper, water, and wildflower seeds in a food processor, then form into tiny muffins. Let dry and then toss in the ground. As the seed bombs receive sun and rain, the paper will eventually compost and the seeds will germinate.

2. Create nature wreaths.

Take your kids on a nature walk to gather interesting leaves, flowers, berries, etc.. To make the wreath forms,  braid together strips of old t-shirts and form into a circle.  Then attach natural items into the crevices and secure with clear fishing line or hot glue. Attach a ribbon at the top to hang your wreath.

3. Construct a bug hotel.

Simple Bug Hotel - these bug hotels make the perfect Garden Craft for young explorers and scientists this Spring and Summer. Easy to assembly (a great garden craft for toddlers too!) and great for observation and exploration. Get closer to nature this summer, with this wonderful and easy garden craft for kids!! Love Bugs. Love Bug Hotel DIYs!! #bugs #bughotel #spring #garden #crafts #steam
SOURCE: Red Ted Art
Create a cozy place for all the creepy crawlies to hang out. Cut a two-liter plastic bottle into two cylinders, then stuff it with sticks, pine cones, bark, or any other natural material. Make sure to pack the organic material tightly. Then loop a piece of twine or yarn around the two cylinders and hang your bug hotel from a tree branch or fence.

4. Create a quilt.

SOURCE: Teach Student Savvy
Textiles make up a huge portion of municipal solid waste—over 16 million tons per year. Teach your kids to repurpose old material that would otherwise end up in the landfill by putting together a cozy quilt. 

5. Create Earth moss balls.

DIY Earth Day Moss Ball
SOURCE: Mother Natured
Pay tribute to our lovely planet on Earth Day with these fuzzy moss balls. Kids who love getting their hands dirty will particularly love this craft. All you do is squish pre-soaked sphagnum moss into a tight ball, wrap it tightly with blue yarn or strips of discarded t-shirts, layer more moss and more yarn, etc. until you’ve created an Earth-shaped orb. Finish with a loop of yarn and hang in a sunny window. To keep your moss ball healthy, simply spray with water every couple of days.

6. Create a hanging garden.


Large plastic bottles become beautiful hanging planters in this green-living and green-thumb project. A great way to make a gorgeous hanging garden.
1.  Google Earth Day for ideas on projects

2.  Follow this LINK for 35 teacher led earth day ideas 

3. Start a garden

4.  Pick up trash in your neighborhood

5.  Come up with your own ideas!

Post in the comments below how you are celebrating Earth Day.